Tuesday, June 19, 2012

Cucumber Salad - Tomatoes, Sweet Onions, Mint and Feta


I wish I could make this post more interesting or imply that it is some mystical complicated process...

But...

1 Tomato (thick sliced and quartered)
1 Cucumber (thick sliced and quartered)
1/2 Sweet Onion (thick sliced and quartered, rings separated)
6 large Mint leaves (Chiffonade cut) Those ribbon cuts, click the blue letters if you want to see a demonstration)
Simple Vinaigrette drizzle (3 parts oil to 1 part vinegar)

Combine the vegetables, drizzle the vinaigrette, sprinkle the feta and mint add salt and pepper to taste...

Enjoy

Fast food lunch... took less than 5 minutes!


Monday, June 18, 2012

Pizza - Salami, Artichoke Hearts and Chunky Tomatoes


I could probably do a couple of pizza posts a week.  Once you get into a pattern, it is about the easiest thing to make from scratch.  This one was easier than most.

When I make pizza dough, I make 4 balls worth at a time.  So I usually have a baggie of dough sitting in the fridge.  There are many different pizza dough recipes out there.  Lately I have been exclusively using a cold proof recipe, meaning there is very little bother with rising, punching down, kneading, etc.  This recipe makes a crisp thin classic crust that works great.  Even when using ingredients that have lots of moisture in them (potentially causing a soggy mushy crust).


Pizza Dough...
4 1/2 cups chilled Flour
1 3/4 tsp Salt
1 tsp instant Yeast
1/4 cup Olive Oil
1 3/4 cups COLD Water (40 degrees)
Makes 4 pizzas

OK, did you read the 2 cold ingredients. Takes an extra hour or two of planning, I measure the water and the flour and pop them in the fridge for a couple hours to get cold. The small amount of yeast, relative to the amount of flour and the cold will make for a flat bread, almost no fermentation (rise). Just enough to soften the taste, but not make a big rise.

In my pre Kitchenaid days, I mixed and kneaded this recipe in a gallon size ziplock bag. Worked great, largely I believe because of the oil in the recipe. Without that, the dough would be too sticky to mix in a bag. But this sure made clean up easy.

Here's what I did...

  • Mix the dry ingredients first
  • add the water and oil about a fourth of each at a time
  • mix well until all the flour is hydrated and you form a large dough ball in your bag 
  • continue kneading for about 10 minutes, or if you use your kitchenaid, use the dough hook attachment, and allow the machine to knead for 7 minutes
  • And now, time to divide... Generously sprinkle a work surface with flour. Also, prepare 4 ziplock sandwich size bags (bigger works fine as well) by spraying the insides of them with spray canola oil.
  • Plop the dough ball into the flour and coat well. Divide into 4 equal parts (or fewer if you know you are making larger pizzas). Put each dough ball into a prepared ziplock bag and refrigerate at least 6 hours, and preferably overnight.

OK... Once you have your dough, for this particular pizza, rolled a ball out flat and round... like a pizza!  To help insure the dough stands up and forms a crispy crust that you can hold, I brushed on some Olive Oil all over the dough.  Salt and pepper a bit before adding the toppings.

Then I just tossed some pantry ingredients...

I opened a can of chunk tomatoes, drained the liquid and spread those around.  Now usually I will make a sauce, but tonight was all about lazy and fast food... and I wanted a chunky tomato pizza.  Why not???

Next I saw a small jar of Harry and David marinated artichoke hearts.  I think Harry and David stuff grows at night.  I can not remember the last time I got a Harry and David food gift basket, but there was and has been a (seemingly) growing pile of tiny jars of stuff with the H&D logo... Like this jar of marinated artichoke hearts.

It did take some effort to get them drained and potentially dry enough to not make that dreaded mushy crust.  Cut up into chunks and used a salad spinner, but it worked and I spread those chunks of heart over the chunks of tomatoes.

As to the salami, I had a hunk left over from an Italian antipasto dish.  Just use like pepperoni, sliced thin and spread around the pizza.  This worked GREAT, as the fat from the salami oozed and rendered out and flavored the pizza!

And add some fresh grated mozzarella cheese.  Bake in a preheated oven on a preheated pizza stone (450 degrees) for 12 minutes

It was incredible!  the salami had some heat to it.  The artichoke was sweet, the tomatoes had a terrific full flavor... Crunchy crust, sweet, heat and FAST FOOD... Total cooking and work time about a half an hour.

I love pizza!


Friday, June 15, 2012

There's the Rub... Actually, here's the basic Rub Recipe


From the celebrated 'to be, or not to be' speech in Shakespeare's Hamlet, 1602:
HAMLET:
To be, or not to be: that is the question:
Whether 'tis nobler in the mind to suffer
The slings and arrows of outrageous fortune,
Or to take arms against a sea of troubles,
And by opposing end them? To die: to sleep;
No more; and by a sleep to say we end
The heart-ache and the thousand natural shocks
That flesh is heir to, 'tis a consummation
Devoutly to be wish'd. To die, to sleep;
To sleep: perchance to dream: ay, there's the rub;

Some very clever smoker needs to rewrite these words to fit a smoker's life.  Not the Marlboro man type smoker, but the guy who sets up that backyard specialty cookware and glorying in the 22 hour cook sessions that convert the "worst" portions of a cow or pig into the best dishes.

So, in the Smoker's version of Hamlet's soliloquy,
"To crock pot or not to crock pot"
would never really be considered, as to most smokers, there is only a vague comparison.  Like I said, it would take someone more clever than myself to come up with a complete version of the speech.

BUT, considering that most smokers need to be refreshed with fresh coal every few hours, that last line... "To sleep, perchance to dream" would need to be changed to...
To sleep, perchance to lose your temp"
A fate worst than death when smoking.

But I digress...

ay, Here's the rub (recipe)


Making your own rub can be very rewarding.  Not only in bragging rights (no small thing when smoker's gather), but also in costs.  I make a HUGE amount.  A fresh rub stays fresh (when stored properly (cool dark place) for about 6 months.  Mine lasts a little less as I use very little salt in mine.  Salt acts as a preservative.  That's why most commercial rubs list salt as their main ingredient.  Buy one and it lasts for much longer than a year with the flavor the same.

Which, in addition to the bragging rights (no small thing), being able to adjust the tastes and ingredients (like salt) is the best reason to make your own.

Here's my basic rub... Make this up and you can use it as a base... Add more garlic, all spice or go crazy with dried Thai chili pepper if you like.  But start with this...

1 cup Sweet Paprika
1/2 cup Black and White Pepper
1/2 cup Garlic Powder
1/2 cup Onion Powder
1/2 cup Celery Seeds
1/4 cup Cayenne Pepper
1 cup "Sodom and Gomorrah" (this is my own low salt/salt substitute, something i use almost every day... Equal parts Course Grind Sea Salt, Garlic Flakes and Black and White Sesame Seeds)

If you do the math, that's a total of 4 1/4 cups, of which only 1/4 cup is actually salt.  If (as you must on an ingredient list on a pre-packaged food) you list the ingredients by quantity, salt would be at the bottom (tied with the cayenne Pepper).


Mix it well.  I always mix my spices by hand.  This helps you to break up the chunks.


Usually you add brown sugar to a spice mix to make a rub.  In the quantities I listed, I add 2 cups of brown sugar.


In this case, I am making Pork Shoulder (pork Butt or Boston Butt if you like).

But this works on any protein, pork, fish, beef... even eggs.  It also tastes great on grilled vegetables and is amazing on grilled pineapple.


So here's the rub!

And here's the leftovers, 6 cups worth, ready for my summer grilling and smoking!


Thursday, June 14, 2012

Steak Onions and Blue Cheese Stromboli


LEFTOVERS... I LOVE Leftovers!

 I especially love unexpected leftovers...

Like the night I invited 6 people over for steak and potatoes, and 7 people showed.

It took a little tap dancing, but everyone is welcome and I do not run out of food.  So I started slicing the steak, adding a blue cheese sauce and quickly made a batch of sauteed onions and...

Viola...

But the best part, by passing a plate and letting people take what they wanted, I was able to have a BIG pile of leftover blue cheese, onion and steak just waiting for something special...

And for me, a quicky Stromboli (my new favorite sandwich)...

 I make pizza dough 4 "balls" at a time, so there is usually a ball of pizza dough in my fridge.  A Stromboli is simply a rolled pizza, sealed and served like a sandwich.  I used my usual GOTO Pixxa Dough...

Pizza Dough...
4 1/2 cups chilled Flour
1 3/4 tsp Salt
1 tsp instant Yeast
1/4 cup Olive Oil
1 3/4 cups COLD Water (40 degrees)
Makes 4 pizzas

OK, did you read the 2 cold ingredients. Takes an extra hour or two of planning, I measure the water and the flour and pop them in the fridge for a couple hours to get cold. The small amount of yeast, relative to the amount of flour and the cold will make for a flat bread, almost no fermentation (rise). Just enough to soften the taste, but not make a big rise.

In my pre Kitchenaid days, I mixed and kneaded this recipe in a gallon size ziplock bag. Worked great, largely I believe because of the oil in the recipe. Without that, the dough would be too sticky to mix in a bag. But this sure made clean up easy.

Here's what I did...

  • Mix the dry ingredients first
  • add the water and oil about a fourth of each at a time
  • mix well until all the flour is hydrated and you form a large dough ball in your bag 
  • continue kneading for about 10 minutes, or if you use your kitchenaid, use the dough hook attachment, and allow the machine to knead for 7 minutes
  • And now, time to divide... Generously sprinkle a work surface with flour. Also, prepare 4 ziplock sandwich size bags (bigger works fine as well) by spraying the insides of them with spray canola oil.
  • Plop the dough ball into the flour and coat well. Divide into 4 equal parts (or fewer if you know you are making larger pizzas). Put each dough ball into a prepared ziplock bag and refrigerate at least 6 hours, and preferably overnight.
 And once you have the dough and the leftovers, you have the Stromboli...

Just roll it our into a large rectangle.

Add the guts (in this case, steak, onions and a blue cheese sauce).

Brush an egg wash (water will work as well) on the edges.  This helps to seal the dough.

Roll up, pressing the wet edges together.

Set seam side down on a sheet of parchment paper.

Do some more egg washing on the top.  This helps the color, as well as aids the toppings to stick.  In this case, I used my beloved "Sodom and Gomorrah" mix of equal parts Garlic Flakes, Coarse Grind Sea Salt and Black and White Sesame Seeds.

Bake in a preheated 350 degree oven for about 15 minutes until the crust is golden brown and delicious!


As this sandwich is!

Monday, June 11, 2012

Flowered Apple Crumble Pie PLUS a Giveaway


It's my absolute favorite Apple Pie Recipe.  Beautiful presentation, unique flavors make this an "Above the rest" pie.  Certainly NOT your grandma's recipe...


See the glistening top.  That's a Mango reduction turned into a thick version of a mango simple syrup that gets brushed on towards the end...

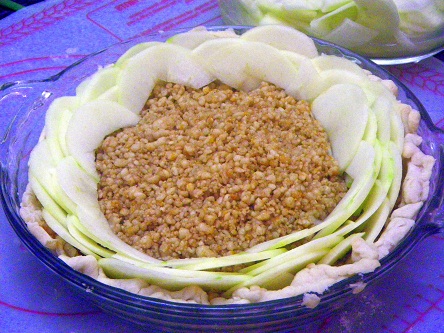
And the thick almost caramel looking center is actually sweetened Almond paste mixed with a few additional surprises for a very unique crumble.


But, no matter how glowing I can describe the taste, you are naturally going to come back to the beautiful presentation of the flowered apple top.

So... Here's my photo how to...


The most time consuming part of the recipe used to be slicing the apples.  Almost as thin as you can get.  I peel and core 3-4 Granny Smith apples, cut them in half an cut thin pieces.


 I say that this used to be the most time consuming part of making the recipe because I just got a GREAT new product to review... The OXO Brand hand held Mandolin!

This made fast (and I mean FAST) work of slicing the apples thin, uniform thickness and well... Just perfect for the dish.  I have used this several times for anything from sweet potato chips to pepper rings for a perfect look to a pizza.  Here's what the OXO website has to say about their Hand Held Mandoline...

"Making cucumber salad, an apple tart or a potato gratin? Try the OXO Good Grips Hand-Held Mandoline. Use the soft knob to simply adjust to the desired slice thickness, and slide the food over the stainless steel blade for perfect, even slices. A clear surface shows slices accumulating below. Slice on a cutting board or plate, or hook the soft foot over a bowl. A food holder protects hands and covers the blade when not in use."

In short... I LOVE this and will be using it over and over!

And the good folks at OXO have even given me a second mandoline to give as a gift... but more about that at the end of the post...

Let's get back to the recipe...


OK, Apple Pie time...

Crust... Trust me when I tell you that you would be best to google someone else's pie crust recipe... Mine is still a work in progress.  So let's just skip this step (although feel free to use a store bought frozen one and follow the directions).

To make the crumble, I bought a 7 ounce tube of Almond Paste.  I sweetened it with 1 cup of powdered sugar and used a couple of TBS of corn syrup to bind everything together.

I made the crumble by putting the almond paste mixture into a food processor, adding 4 TBS brown sugar and process away until you get a nice crumbly mixture.  Spread this around the pie shell.


And now, start adding the Apple slices.  I did put the slices in some lemon water to keep them from browning.

You are forming the petals of a flower.  Stand them up on the flt side with the rounded edges sticking up and just work your way around the pie edges...


Don't worry to much about being uniform, it's the rustic look that is so appealing.


And keep going... except...

I am one of those people...

I LOVE adding cheddar cheese to my apple pies.  In this case, rather than a slice on top melted in a microwave (YUM), I added some grated cheddar inside each go around of the slices...


Also as you go around, keep pressing in on the bottom of the apples so that the slices come as close to standing up as possible.


And keep going... apples, cheddar and press all the way around several times, until you get a finished apple flower!


Sprinkle a TBS of sugar over the entire thing.


There's a step I did not photograph...

BUTTER... Butter butter butter!  This makes the crumble incredibly DELICIOUS!  DO that Meryl Streep as Julia Child impression... Butter!

Take half a stick of butter, slice it thin and spread the slices over the pie.  As the pie cooks the butter will ooze down through the apple slices and flavor the almond paste crumble!

Bake at 425 degrees for @ 35 minutes, checking to make sure the apples are getting a delightful charred edge look without it getting a painful burnt look.


While the pie is baking, make some mango flavored syrup.

And again, I forgot to take photos, but it is very easy to do...

Slice a mango, peel and cut off the pulp.  Slice, dice and mince as best you can to get small pieces.  Toss into a sautee pan and begin to cook.  Add 1/4 cup water and 1/4 cup sugar and stir and cook for about 10 minutes until the mango breaks down and the syrup forms.

Last step is to run this through a food processor or blender to make it smooth and liquid.

Then, while the pie is HOT, fresh from the oven brush this on as a glaze...


I promise, nothing like your standard apple pie... Beyond delicious, memorable and a dessert highlight!


And now, as promised... the handy dandy slicer OXO HAND HELD MANDOLINE...

Can be yours for the low low price of FREE...

Just leave a comment below (be sure that I can contact you with either an email address or a blog link).  Friday this week I will do the random number thingy and pick a winner.  Sorry, but must limit this to US residents only.

Good luck to all and comment away!


Friday, June 8, 2012

What to give the Grill Man in Your Life - Chocolate Bacon


Father's Day... A week away.

Have you started pondering the perfect gift for the man in your life?

Give him what he really wants.  Something that acknowledges his unique tastes and a unique presentation for everyone's favorite food...

Chocolate covered bacon!!!


It really is very easy.  I tried a new presentation that worked very well.  I cut a slice of bacon into three equal sized pieces.  Then I rolled each piece into a tube shape and secured with two toothpicks.  Then bake 'em.

Pre heat oven to 400 degrees e
set each tube of bacon on a parchment sheet covered cookie sheet
Bake for 20 minutes until the edges are crispy
Allow to cool completely before dipping.

For the chocolate, select your favorite dipping chocolate, melt slowly in a microwave or double boiler.  Be careful that the chocolate does not get above 88 degrees.  Takes a little time and effort, but the slower you melt chocolate the better.  Also "Temper" your chocolate by adding about 20% at the end without additional microwaving or off the heat.  Do a google search for tempering for more details... Makes the best chocolates when it is done correctly.

And from there, dip away.  I dipped, allowed the chocolate to drip off as much as possible.  Air dried for about 30 seconds for each piece and then stood the piece on end.

When I had them finished and they completely dried and set I garnished with a drizzle of white chocolate.

Sweet Salty Delicious and.... BACON BACON BACON!!!


Thursday, June 7, 2012

Cinnamon Rolls


This is yet another leftover recipe... really.

Did you all catch my Peach Strudel post I did over at my sister blog...  Inspired by eRecipeCards???

Have you seen the fresh peaches showing up at the grocery store lately.... And CHEAP!  Sounded like strudel time to me.  Well, the strudel came out terrific.  But I planned ahead.  I made a double batch of the dough, planning on left overs.

So, early one Sunday morning, I woke early, sneaked out of the bed so as not to disturb the rest of my long suffering (her with the inconvenient day job) wife.  I took the spare ball of dough out of the fridge,  and did a quick warm up (kneaded by hand for about ten minutes to get the dough warm enough to work with, yet still cold enough to roll out.


Form into a rectangle about  1/12 foot wide, 1 foot tall.

Mise en Place a melted stick of butter
The cinnamon mix of 2 TBS Sugar, 1 TBS ground Cinnamon


Brush the butter over the entire dough surface.  As much as the dough will hold and sprinkle the sugar mixture over the butter... As much as you can with it all absorbing.

Moisten the far side of the dough (top edge in the photo) with more of the butter so that it sticks when you roll it up.

Starting at the bottom, evenly roll up the dough into a stick.

Slice the stick of sugared dough into about 1 to 1 1/2 inch circles... Like this...


Stand them up in a pie plate, allow to rise for about 30 minutes.  This dough is not a heavy yeast dough, but they did come rise a bot, adding about 50% of volume.

Bake at 375 degrees for about 12 minutes (I like them a little dough and chewy, so underdone.  Feel free to bake for 15 minutes if you like.

While they are baking, take 1/2 cup of confectioner's sugar, add a tbs of milk (more to get the thinner, less to get a thicker consistency) and stir into a drizzle.


And your long suffering spouse with those inconvenient day jobs can wake up to the smell of fresh made cinnamon rolls.

A pretty good use for leftovers... Be sure to check out my post on the Peach Strudel to get my recipe for the sweetened dough that I used.  Worked pretty good!