Saturday, February 22, 2014

Korean Beef Brisket Smoked on a Weber Kettle Grill - Grilling Time


This is post #3 in my series on making restaurant quality... dare I imply competition level BBQ on a smple Weber kettle grill.  You know them, the common ball shaped grills that just about everyone either has, had or at least seen in your neighbor's back yard. I do happen to own a dedicated smoker as well as a couple of other types of grills.  But, if you can't cook good BBQ on a Weber, you shouldn't be buying those expensive labor saving devices.

I have already made some Smoked Ribs on my kettle

I also made a couple of HUGE Boston Butts (Pork Shoulder) for several pounds of Smoked Pulled Pork.  Like this brisket, pork shoulders will take several hours to cook... at least 15 and usually longer.  In order to maintain proper temperature it is important to add coal briquettes to the grill every hour.  So either you need a team to maintain the 24 hour schedule or you lose a nights sleep...

Or you learn a trick and you learn how and why meat cooks and absorbs a smoke flavor we all love...  But first... The basics...

Like how to smoke a Large Beef Brisket!

And you can not get more basic than the ubiquitous Weber Kettle.  They are cheap (under $100), easy to use and I would guess that more people have started and learned on a Weber than any other brand or style of grill.  Much as I love my expensive smoker, if you can't make a brisket on a Weber, you really should not spend the money on a dedicated smoker.

So, for Ribs 101, I went old school and broke out the Weber...

But before we even get outside to the grill, it's time to prepare the meat.

First step is the Korean marinade.

Korean Style
Brisket Prep


Ingredients
  • For Marinade:
  • About a 15 Pound Beef Brisket
  • 5 Medium Kiwi, peeled and pureed into a paste
  • 1 Cup Dark Brown Sugar
  • 1=1/2 Cup Soy Sauce
  • 1 Head of Garlic, peeled, smashed and minced
  • 1/4 Cup Fresh grated Ginger
  • 1/4 Cup Sesame Oil
  • 1/4 Honey
  • 2 TBS Red Pepper Flakes
  • Large Pinch Black pepper
  • 4 (16 Ounce) Bottles 7-Up (Lemon Lime Soda).. NOTE: NOT DIET
  • Drizzle of Olive Oil
  • For Rub:
  • 1/4 Cup White Sesame Seeds
  • 1/4 Cup Black Sesame Seeds
  • 1/4 Cup Garlic Flakes
  • 1/4 Cup Coarse Grind Sea Salt
  • 1/4 Cup Brown Sugar
  • 1 tsp Powdered Thai Chili pepper
  1. Puree the kiwi into a paste.  Rub this paste over the entire brisket.
  2. Rub the brown sugar into the kiwi coated brisket.
  3. Mix all remaining ingredients for the marinade completely.
  4. In a LARGE pan or very large specialty marinading zip lock bag, completely immerse the brisket in the marinade.  Marinade in the refrigerator for 12 to 24 hours, turning occasionally to insure even distribution of the marinade.
  5. After 12-24 hours, remove the meat and allow to air dry in the refrigerator for a couple of hours.
  6. OK, mix all the rub ingredients together.
  7. Coat and RUB the mixture onto the brisket.  It's called a rub, not a sprinkle so rub this in well.
  8. Allow to rest with the rub on for an hour at room temperature while you prepare the grill...
OK... During the one hour "rest", it is now time to prepare your grill...

There are a couple of must have accessories that you will need to guarantee success...

The type of coal is very important.  DO NOT EVER EVER EVER USE MATCHLIGHT TYPE COAL.  Instead look for a brand that advertises itself as 100% natural or all wood.  Anything else will have chemicals used to hold the briquettes together.  These chemicals will add an unpleasant taste to your meat.  Use 100% natural.

You will want a "Chimney" to light the coals... You'll see what I mean in a minute...

Next you need a thermometer to measure the internal temperature of the grill.  This is not a meat thermometer, instead it is one to be used to measure the air temperature.  One of those dial types works fine, as long as you have a long enough tip to reach the actual temperature of the cooking level.  The top of the kettle will be much hotter than the cooking level just a few inches lower.  Stick this through a vent, making sure the tip does not touch any meat or metal and it works fine.

And that's all the "must haves".  It does help to have a meat thermometer as well.  Certainly if you make smoking a way of life you will want to invest in a good thermometer.

OK... Time to prep the grill for INDIRECT HEAT... Here's the most important part in order to get your ribs restaurant quality.  It is important that the heat and smoke travel around the kettle, like a convection oven.  It is equally important that you do not "grill" the ribs, meaning the heat (coals) is not directly below the meat.  That is too hot, too direct of heat.  Direct heat will burn, indirect will allow low and slow smoking, making moist tender and delicious!

So... Here's the steps for indirect heat on a Weber Kettle Grill...

 OK, remember All natural Wood Briquettes...

The bag also reads 100% Hardwood Charcoal.

OK... there is a math factor here... 20 Briquettes.  That's all you need now, count out 20 briquettes and put them in a chimney...
 And light the chimney... You use a few pages of newspaper wadded up and stuffed into the bottom, there is a wire rack keeping the newspaper separate from the coal.  Light the paper and let the coals sit on top of the fire for about 10 minutes...
 After 10 minutes the coals should show signs of being lit... Ash around the edges and deep inside glowing red.  Also little wisps of smoke....

If not, relight another few pages of newspaper and repeat the 10 minute wait.

If so, wait for another 5 minutes and then pour...
 BUT...

Only pour around one edge... Indirect remember.  You do not want the coals spread to reach under the meat.

Pop on the grate and you are now ready to cook...

Notice that I have the handles of the grate, one side directly over the stack of lit coals.  This is IMPORTANT so that you can add briquettes without removing the grate.
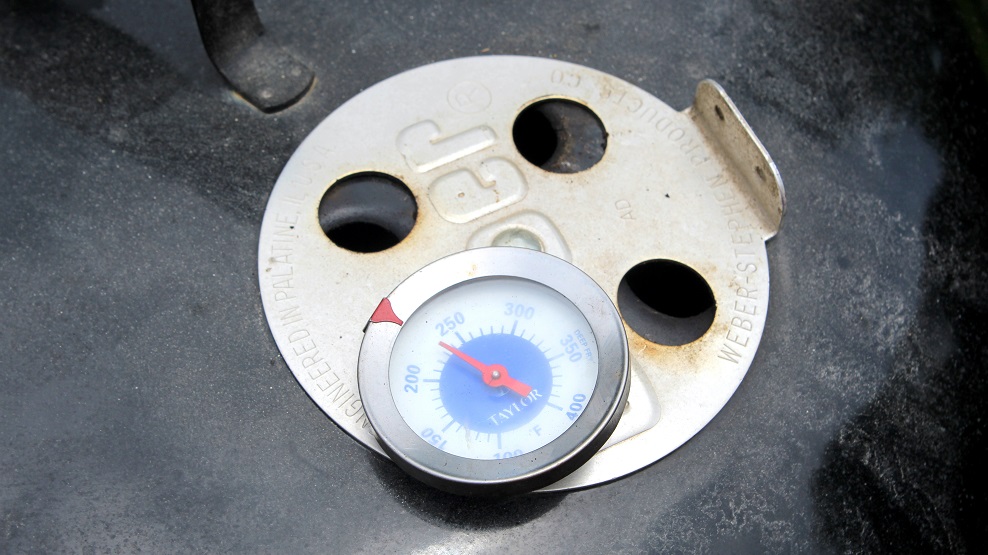

And the photo above shows the MOST IMPORTANT TIP for insuring Restaurant Quality Low and Slow smoked ribs...

TEMPERATURE.  225 is your goal.  Never higher than 250, never lower than 220.  The air vents at the op and at the bottom of the kettle are adjustable, open wide and more oxygen flows into the kettle and the fire burns hotter.  Close them and no oxygen gets in and the fire dies.  You need that happy medium.  Check your temperature early and often.  It will take you another 10 minutes or more to get the vents right.  Do this before you add the meat.

OK... FINALLY, time to start cooking...

Arrange the meat fat side up on the grill NOT over the coals... NOT over the coals.

In tomorrows post I am going to talk about smoked beans.  I always try to smoke beans while smoking meat.  This way as the beans simmer, the steam will help add moisture to the meat, aiding in the meat absorbing more of the smoke flavor.

But for today, should you decide to smoke beans as well (do it), position your beans directly over the lit coals.  This lets the beans simmer.

Now, with all this, the initial 20 briquettes have started to burn out.  Before you close up, time to add more fuel to the fire.

Again... MATH... count out 10 and only 10 briquettes.  Just add these through that opening in the grate that you positioned over the lit coals.  No need to light them, they will land on the lit pile and gradually light themselves.

I add a few wood chips of Apple or Pecan wood as well.  Not too much, you want a gentle smoke, not a billowing chimney.  But also know that the natural wood briquettes also give off enough smoke to flavor the meat.

OK... NOW close the lid.  Position the temperature probe through a vent and start measuring the temperature.  You have added a lot of mass so it will take some fidgeting of the vents to get the kettle to the right temperature...225... no more than 250, no less than 220.

DO NOT LOOK... the temperature probe will tell you the internal temp.  If you open the lid you will lose your heat and have to start all over again... DO NOT OPEN THE LID.

And, you are now ready to relax.  This is 90% of the job.  the rest is simply to maintain the temperature.  In a kettle cooker, the coals will begin to die after about 1 hour.  So, simply keep an eye on the clock and the temperature.  After 1 hour if you notice the temperature begin to dip towards that 220 mark, time to add more coal.

BUT...

VERY IMPORTANT, have a plan before you lift the lid.  Longer you have the lid open, the more heat you use up and have to start all over getting back to temp.

I want to stir the beans.

and I want to add 10 and only 10 more briquettes.  Again, no need to pre light, you will simply put them through the grate as before, letting them fall onto the still smoldering older coals... they will light.

Less than 1 minute total time open

So, open... Stir... add coal... add more wood chips... Close.

While doing all this, you are multi tasking, checking to see how the meat looks.  It should not be charred at all, just starting to look a little darker is all.  If they are charred, you have them too close to the fire or the fire is too hot.  Use those vents to get the temperature lower. or move the meat further from the coals and flip the back to the front facing the coals

Once the lid is closed, wait for about 10 minutes and make sure the temperature returns to where you want it.  If it does not climb you may need to use a stick to move the coals around a bit.

OK... It takes at least 6-8 hours for your brisket to get to an internal temperature of 140 degrees.  After six hours I add checking the internal temperature of the meat to my hourly check list.  Your actual final finished temperature goal is 185-190 degrees.  At 140 degrees the meat has reached a point when the smoke flavoring has already been as infused as it is going to get.  So no need for smoke... and SHHHH... here's the trick...

NO NEED TO COOK ON THE GRILL ANY MORE.  The rest of the cooking session can be done low and slow inside on a conventional oven.  In fact, maintaining a low temperature (now only 200) in the oven, consistent temperature is going to get better results than you would achieve on a smoker.

So, once you reach 140 degrees... Here's the next step...

Aluminum Foil... HEAVY DUTY Aluminum Foil, double wrapped around the meat.  Put this into a BIG Roasting pan (Like a turkey roasting big pan).  This is important as the meat, even though wrapped) was LOTS and LOTS of moisture in and this will leak out of the foil wrapping.

Set the oven to 200 degrees, insert a remote temperature probe so you can monitor the internal temperature of the meat without opening the oven... Set it all up and walk away... for hours and hours.  I cooked this particular piece of beef in the oven for an additional 17 hours.  The long slow cooking process allows the fat to simply render into butter soft flavoring for the meat.

The marinade has soaked into the meat, flavoring every bite, the fat has softly tenderized every bite... All is right with the world!

When you reach 185-190 degrees, remove from the oven, unwrap and set the meat on a cutting board... IMPORTANT... VERY IMPORTANT... Allow the meat to "rest" uncut for 30 minutes.  This allows the juices to redistribute, reabsorb into the meat.  If you do not do this, the meat when cut the meat will bleed out most of the juices,making for a very dry brisket.  You've invested about a full day and night into this, don't ruin it now.

Also, reserve a cup of the juice from the pan when you pull the foil wrapped meat from the oven.  Just prior to serving, brush this onto the meat to add a little extra luster.

And this indeed was WONDERFUL!  Deliciously exotic Asian flavors throughout.  The meat was perfectly cooked; tender pull apart juicy, wonderful presentation, all that sugar caramelizes on the outside for a deep dark bark.

I have made several briskets in my smoky life and this by far was my best

Serve with Beans, potato salad and fresh grilled corn on the cob and you ARE Master of your Domain!

Enjoy!


*************************************************************************

So,  I am pleased to list this as one of my Growing list of  "52 Grilling Time Secret Extras" or "52 Ways to Cook BBQ and Grilling Recipes"!!!

Well over 52 recipes actually as I just can't stop... Over 100 in one grilling season (I love to grill!). But not just leat... Drinks, Condiments (LOTS of different BBQ sauces), Drinks, Desserts... even specialty items like GRILLED Pizza, and fun shaped Watermelons.  Easy and these ideas will make you the MASTER of your Backyard Domain!

****************************PINTEREST**************************

Come and find me on Pinterest... Any of my "52 Ways to cook" Boards are worth following.  If you like this post, please take a second and "Pin" this to your own boards... Better yet, if you are part of a foodie group board please take a second and add this post to your group pins... best way to show your Love!

And BTW, if you are not yet part of a group board, drop me an email at Contact@eRecipeCards.com and request to be added to my group board... FAVORITE FOOD BLOGGERS! (be sure to include your pinterest ID when you write)  Once you are added, any pins you add will be seen by 10s of THOUSANDS of followers of the board (and growing daily).

Rules, only 2... 
  1. In order to join you need to start following the group board as well as at least one of my boards.
  2. And you must ONLY pin original sources, posts from food related bloggers only.  If you are a blogger, this is a great way to have thousands of potential readers see your work,  If you are a fan of bloggers, a great way to share your favorites...
    Come and be a part of ... FAVORITE FOOD BLOGGERS! on Pinterest

Friday, February 21, 2014

Grilled Potato Wedges with Cheddar Cheese Sauce - 52 Side Dishes from the Grill


The sauce is made from white cheddar cheese... If I had thought about the blog, I probably would have used a yellow cheddar, but... ah well.

The sauce is incredibly easy, just two ingredients.  The trick is to grill potato wedges.  No real trick, just some knowledge that will save the BBQ Day...

You can NOT grill potato wedges.

They are too thick and by the time you have the outside crispy crunchy and perfect, the inside is still raw.  So, the trick is to get them crispy crunchy and perfect on the outside and yet the insides are perfectly cooked as well... like a baked potato.


And that's the trick.

These are microwaved baked potatoes (slightly al dente), then moved to the grill to finish.  A bit of a cheat, but this way they are always exactly right!

My microwave has a very convenient button that allows you to set the potatoes in the oven, push a button, tell the internal computer how many potatoes you have and bung bang boom, you have fast baked potatoes.

I set the machine to one less potato than I am actually cooking.  This way they are not overcooked by the time you serve.  Like I said, slightly al dente (undercooked).  But by the time you are finished, you have crispy crunchy perfectly cooked inside and out ready to serve!

The sauce is very very easy...

1 Cup Sour Cream
1 Cup freshly grated Sharp Cheddar Cheese

In a small sauce pan, add the sour cream and heat.  Add the cheese and stir occasionally until the cheese is melted.  You can even do this on the grill if you have the grate space.

pour over the wedges and garnish with sliced green onions and a little paprika.


So, one night on the grill.  The whole platter took about 20 minutes to prep, another 20 minutes on the grill and you feel like the king of the world's back yards!!!

Hawaiian Burgers with Gorgonzola Blue Cheese Sauce... Garnished with GRILLED Grilled Onions...
And of course, what makes a Hawaiian Burger Hawaiian, Grilled Pineapple!
All on a fresh home made Hamburger Bun!

These Potato Wedges as a side dish and more Grilled Pineapple as a dessert!

Just one night on the grill!

*************************************************************************

So,  I am pleased to list this as one of my Growing list of  "52 Grilling Time Secret Extras" or "52 Ways to Cook BBQ and Grilling Recipes"!!!

Well over 52 recipes actually as I just can't stop... Over 100 in one grilling season (I love to grill!). But not just leat... Drinks, Condiments (LOTS of different BBQ sauces), Drinks, Desserts... even specialty items like GRILLED Pizza, and fun shaped Watermelons.  Easy and these ideas will make you the MASTER of your Backyard Domain!

****************************PINTEREST**************************

Come and find me on Pinterest... Any of my "52 Ways to cook" Boards are worth following.  If you like this post, please take a second and "Pin" this to your own boards... Better yet, if you are part of a foodie group board please take a second and add this post to your group pins... best way to show your Love!

And BTW, if you are not yet part of a group board, drop me an email at Contact@eRecipeCards.com and request to be added to my group board... FAVORITE FOOD BLOGGERS! (be sure to include your pinterest ID when you write)  Once you are added, any pins you add will be seen by 10s of THOUSANDS of followers of the board (and growing daily).

Rules, only 2... 
  1. In order to join you need to start following the group board as well as at least one of my boards.
  2. And you must ONLY pin original sources, posts from food related bloggers only.  If you are a blogger, this is a great way to have thousands of potential readers see your work,  If you are a fan of bloggers, a great way to share your favorites...
    Come and be a part of ... FAVORITE FOOD BLOGGERS! on Pinterest

Thursday, February 20, 2014

Garlic Snow Peas, Cherry Tomatoes, Parmesan AND GARLIC - 52 Side Dishes from the Grill


This is an OMG recipe... OH MY GOD is this FANTASTIC!

And simple, all of the ingredients (except some Olive Oil) is in the title.  And such beautiful colors, Green White And Red like the Italian Flag!

To the right you can see the only thing you need out of the ordinary... A frying pan with holes in it (commonly called a grill pan).  The holes are small enough that the veggies do not fall through, yet big enough to all ow the char and grill flavors to get into the the flavor of the dish!

There is nothing like heated tomatoes.  The term bursting with flavor is literal here as the tomatoes will split and ooze sweet juices to flavor the peas.  Tomatoes have a natural sweetness that heating brings out and intensifies.

Unlike anything you can make on a stovetop!  And perfect side dish to serve next to some whipped potatoes and delicious PINEAPPLE JERK Grilled Chicken Thighs (Come back tomorrow for that recipe).


OK... Here;s what I did...


Garlic Snow Peas, Cherry Tomatoes, Parmesan AND GARLIC


Ingredients
  • 1/2 Cup Extra Virgin Olive Oil
  • 5 Cloves Garlic, crushed and copped
  • 1 Package (8 Oz.) Snow Peas, trim ends
  • 1 Package (10 Oz.) Cherry Tomatoes, check to be sure stems are removed
  • Shaved Parmesan Cheese For garnish
Cooking Directions
  1. In a small sauce pan, heat the Olive Oil over a low flame.
  2. Add the Garlic to the oil and slow heat for about 20 minutes to break the garlic oil into the olive oil. Be careful to not heat to high. Warm is enough
  3. In a large bowl, add the tomatoes and snow peas and coat with the warm garlic oil. Stir to coat completely.
  4. Move out to the grill, spray the grill pan with non-stick spray and set the grill pan directly over the hottest part of the grill
  5. Add the Tomatoes/snow peas and saute for about 5 minutes, stirring occasionally.
  6. Just as the tomatoes start to split open, remove from heat and serve. This only take a few minutes, so watch carefully.
  7. Serve HOT and ENJOY!

*************************************************************************

So,  I am pleased to list this as one of my Growing list of  "52 Grilling Time Secret Extras" or "52 Ways to Cook BBQ and Grilling Recipes"!!!

Well over 52 recipes actually as I just can't stop... Over 100 in one grilling season (I love to grill!). But not just leat... Drinks, Condiments (LOTS of different BBQ sauces), Drinks, Desserts... even specialty items like GRILLED Pizza, and fun shaped Watermelons.  Easy and these ideas will make you the MASTER of your Backyard Domain!

****************************PINTEREST**************************

Come and find me on Pinterest... Any of my "52 Ways to cook" Boards are worth following.  If you like this post, please take a second and "Pin" this to your own boards... Better yet, if you are part of a foodie group board please take a second and add this post to your group pins... best way to show your Love!

And BTW, if you are not yet part of a group board, drop me an email at Contact@eRecipeCards.com and request to be added to my group board... FAVORITE FOOD BLOGGERS! (be sure to include your pinterest ID when you write)  Once you are added, any pins you add will be seen by 10s of THOUSANDS of followers of the board (and growing daily).

Rules, only 2... 
  1. In order to join you need to start following the group board as well as at least one of my boards.
  2. And you must ONLY pin original sources, posts from food related bloggers only.  If you are a blogger, this is a great way to have thousands of potential readers see your work,  If you are a fan of bloggers, a great way to share your favorites...
    Come and be a part of ... FAVORITE FOOD BLOGGERS! on Pinterest

Wednesday, February 19, 2014

LOADED Bacon Wrapped Dates - 52 Appetizers from the Grill


I first tried one of these off of a food truck in Tennessee.  LOVED em and have been working on a signature version for awhile.  After a few trials and errors I came up with this combination of the sweet dates, the savory tomato pesto, a spicy Pecan surprise in the center surrounded by creamy cheesy goodness and all wrapped up inside BACON BACON BACON!

Delicious and easy to fit into any BBQ, Burgers and dogs or a multi course extravaganza!

All the prep work and assembly can be done hours in advance so you can just toss on the grill, cook and serve.  These are small enough you can just add around whatever you have cooking.

Fantastic little appetizers.  I try to pull them from the grill same time I am "resting" my meat so everyone has an appetiser to chew on while waiting.

But make enough, they are WONDERFUL and it is hard to stop at just one.


OK... Here's what I did...


LOADED
Bacon Wrapped Dates


Ingredients
  • FOR The SPICED PECANS
  • 2 TBS Butter
  • 12 Pecan Halves, Do not get pieces, as big and whole as you can find
  • 1/2 tsp Salt
  • 1/2 tsp Cayenne Pepper
  • FOR The FINISHED DATES
  • 12 Medjool Dates
  • 4 Ounces Goat Cheese
  • 4 Ounces SunDried Tomato Pesto
  • 6 Slices Thick Cut Bacon, cut in half
  • Toothpicks or Skewers
Cooking Directions
  1. Hours before your BBQ, do the prep work... FIRST, make the spiced Pecans...
  2. In a small saute pan, Melt the butter over medium high heat.
  3. Add the pecan halves, salt and cayenne pepper. Reduce heat to low and saute the pecans until they just start to toast, about 10 minutes. STirring occasionally, the pecans will also absorb most of the butter making them slightly soft but still slightly crunchy for texture.
  4. Meanwhile, prepare the remaining ingredients...
  5. Slice each date through just one side so that the seed is exposed but the dates are not cut in half. Just enough to remove seed and open a pocket in the date.
  6. In each date, insert an equal small amount (about a 1/2 tsp each) of the Cheese, sun dried tomato Pesto and one of the finished Spiced Pecans.
  7. Wrap each with the half bacon slices and secure with a toothpick or a long skewer.
  8. Refrigerate until ready to cook.
  9. Over direct heat on your grill, add the wrapped dates. Takes about 10 minutes for them to cook. The dripping bacon grease will cause flare ups so stay close and turn often until all sides of the bacon is cooked. The dates and the stuffing are safe to eat as is, you are just heating them. The dish is finished when the bacon is cooked.
  10. Serve HOT from the grill and ENJOY!!!


*************************************************************************

So,  I am pleased to list this as one of my Growing list of  "52 Grilling Time Secret Extras" or "52 Ways to Cook BBQ and Grilling Recipes"!!!

Well over 52 recipes actually as I just can't stop... Over 100 in one grilling season (I love to grill!). But not just leat... Drinks, Condiments (LOTS of different BBQ sauces), Drinks, Desserts... even specialty items like GRILLED Pizza, and fun shaped Watermelons.  Easy and these ideas will make you the MASTER of your Backyard Domain!

****************************PINTEREST**************************

Come and find me on Pinterest... Any of my "52 Ways to cook" Boards are worth following.  If you like this post, please take a second and "Pin" this to your own boards... Better yet, if you are part of a foodie group board please take a second and add this post to your group pins... best way to show your Love!

And BTW, if you are not yet part of a group board, drop me an email at Contact@eRecipeCards.com and request to be added to my group board... FAVORITE FOOD BLOGGERS! (be sure to include your pinterest ID when you write)  Once you are added, any pins you add will be seen by 10s of THOUSANDS of followers of the board (and growing daily).

Rules, only 2... 
  1. In order to join you need to start following the group board as well as at least one of my boards.
  2. And you must ONLY pin original sources, posts from food related bloggers only.  If you are a blogger, this is a great way to have thousands of potential readers see your work,  If you are a fan of bloggers, a great way to share your favorites...
    Come and be a part of ... FAVORITE FOOD BLOGGERS! on Pinterest

Tuesday, February 18, 2014

Alabama White BBQ Sauce for my Holiday Turkey - 52 Sauces and Rubs


We are at the end of my "Practice" Thanksgiving meal.  I made this a couple of weeks before Thanksgiving so I could try a few new dishes.  Among them is my brand new favorite, Alabama White Sauce that I use to sauce up my slices of turkey.  Adds a beautiful contrasting look to the caramelized smoke turkey (See yesterdays post, I used a Cranberry BBQ Sauce I whipped up to get that deep rich mahogany color).

But it's the taste that sets this apart.  The sauce is Mayonnaise based.  Think of an Aioli and you will be close.  It has been made famous by Chris Lilly owner and celebrity cook of Big Bob Gibson BBQ joint in Alabama.  I did a little research and found several versions of this recipe, actually more than one version credited to Chris himself.  So I took a little of this recipe and a little of that one and came up with a version I liked best.  My main contribution of the legend is the extra Cajun Spices.  Mayo on turkey is just fine for a sandwich.  As a serving sauce, I like the extra kick.

The sauce is my new favorite.  I usually end up buying a store bought pre-seasoned, pre-cooked rotisserie chicken from Sam's Club once a week.  Much as I like cooking different meals with the bird (see my "52 Uses for a rotisserie chicken" page).  Lately, just a few slices and this sauce for a sandwich has been my use of choice.  It also tastes great on slice pork loin.  And if you are serving a sliced veggie tray, this makes a lick the celery stick dipping sauce.  Beware of those double dippers.

If you like the looks of that turkey, take a look at this post...


That post has all the how-to's that you need for a spatchcocked turkey.  That's BBQ Speak for taking the back bone out and butterflying it so that the meat cooks more evenly.

It also covers smoking your turkey on a Weber Kettle Grill.  No need for that $1,000 dollar smoker when you have one of those in your back yard.  Frees up the oven for fresh pie anyway!  

Give this new regional sauce a try... It is destined to be a favorite of yours!


OK... Here's what I did...


Cajuned Up 
Alabama White Sauce


Ingredients
  • 2 Cups Mayonnaise
  • 1 Cup Apple Cider Vinegar
  • 2 TBS Lemon Juice
  • Several turns of a Pepper Grinder
  • 1 tsp Sea Salt
  • 2 TBS (more or less - To Taste) Cajun SPice Mix
Cooking Directions
  1. Mix all ingredients together.
  2. It is important to taste as you add the Cajun Spice Mix. Add "to taste"
  3. Refrigerate for at least 8 hours before using. Brush lightly over chicken, turkey or pork during the last few minutes of grilling.
  4. Or drizzle over cooked sliced turkey on a serving platter (Baptized)
  5. OR... This sauce is also great as a dipping sauce so set some aside for a veggie tray.
  6. Serve chilled and ENJOY!!!

So, OK... As I said, this is the final post of my "practice" Thanksgiving meal.  All in all, I am very pleased with the results.  Here's a recap.  As always, double click the photos or the blue lettering for the magic of the internet to show you the recipes...

For my BREAD, instead of rolls I served thick slices of buttered 10 Minute Bread Machine Rosemary Bread.

It is called 10 minute bread not because start to finish you are done in 10 minutes, but because, thanks to the use of the bread machine, it only takes 10 minutes.  the machine does all the hard work, while all you do is shape the loaf and bake in your oven.  EASY PEASY and looks Artisan!

For the first of my side dishes I decided on a new Stuffing (actually cooked outside the bird, so more accurately - Dressing), Outside The Box Dressing! 

Filled with Onions, Sweet Corn and Spinach, but the real star of the show is the Beer Bread used for the bread... This was amazing and is my new GOTO Stuffing (pondering making a one pot meal with this and some Beer Brats mixed together... for another day).

Every meal needs some vegetables, here's mu holiday version of green beans... Candied Bacon wrapped Green Bean Bundles!

Now these veggies, no picky 10 year old would turn don... Veggies wrapped in bacon and caramelized with brown sugar... Holidays are about indulgence.

And for the classic... Mashed Potatoes.  I posted a review of Alton Brown's Mashers, Garlic Mashed Potatoes.

Of course they have the Alton flare, and sure enough... Everything you hope garlic mashers would be.  Classic sure, but the best!

Next side is a twist on TWO classics... Cranberry sauce and Sweet Potatoes.  This is a wonderful combination... Honey Buttered Mashed Sweet Potatoes with Walnut Cranberry Sauce!

The secret as they say is in the sauce.  This cranberry sauce is by far the best I have ever had.  

As to meat... I like to offer choices.  In addition to the turkey, I smoked a brisket... a simple THREE INGREDIENT INJECTED SMOKED BRISKET With a TEXAS SPICE RUB for when it absolutely positively has to be moist tender and delicious!

And it was!

And finally... save room for dessert...

I made two pies.  I struggled for a long time to find a scratch made pie crust that was consistent and good.  I finally went old school and listened to my Mother-In-Law's scratch Lard/Shortening recipe... works everytime and is included on all the links.


Yeap, loaded with Caramel Sauce inside the nutty custard center.

And finally, old school once again... with an old fashioned Sweet Potato Pie (A personal favorite)!

This year, I have an awful lot to be thankful for.  My wife with the inconvenient day job is about to start a new adventure that will have life changing consequences (more on that next month).  For my "Practice" Thanksgiving, my Mom and step-father came for an all too rare visit from Phoenix.  It has been almost a decade since she came North to visit and what a joy.  In addition, my son, PFC James came to visit from the Army.  He is stationed in Fort Riley Kansas, only a couple of hours away.  He already has his marching orders and he will be involved and deployed in closing bases in Afghanistan this time next year,  It's an odd feeling of incredible pride (Medic in the Army), and incredible fear (Someone over there hates him enough to shoot at him).  But for now, in all his travels, he is stationed only a couple hours from me... Now THIS is a reason to be Thankful.


*************************************************************************

So,  I am pleased to list this as one of my Growing list of  "52 Grilling Time Secret Extras" or "52 Ways to Cook BBQ and Grilling Recipes"!!!

Well over 52 recipes actually as I just can't stop... Over 100 in one grilling season (I love to grill!). But not just leat... Drinks, Condiments (LOTS of different BBQ sauces), Drinks, Desserts... even specialty items like GRILLED Pizza, and fun shaped Watermelons.  Easy and these ideas will make you the MASTER of your Backyard Domain!

****************************PINTEREST**************************

Come and find me on Pinterest... Any of my "52 Ways to cook" Boards are worth following.  If you like this post, please take a second and "Pin" this to your own boards... Better yet, if you are part of a foodie group board please take a second and add this post to your group pins... best way to show your Love!

And BTW, if you are not yet part of a group board, drop me an email at Contact@eRecipeCards.com and request to be added to my group board... FAVORITE FOOD BLOGGERS! (be sure to include your pinterest ID when you write)  Once you are added, any pins you add will be seen by 10s of THOUSANDS of followers of the board (and growing daily).

Rules, only 2... 
  1. In order to join you need to start following the group board as well as at least one of my boards.
  2. And you must ONLY pin original sources, posts from food related bloggers only.  If you are a blogger, this is a great way to have thousands of potential readers see your work,  If you are a fan of bloggers, a great way to share your favorites...
    Come and be a part of ... FAVORITE FOOD BLOGGERS! on Pinterest