Pulled pork... The stuff of legends! And for many, the very definition of BBQ. Slow smoked (
18 hours is my usual time) over wood coal until you have battered this fatty tough piece of meat into moist tender succulent deliciousness!
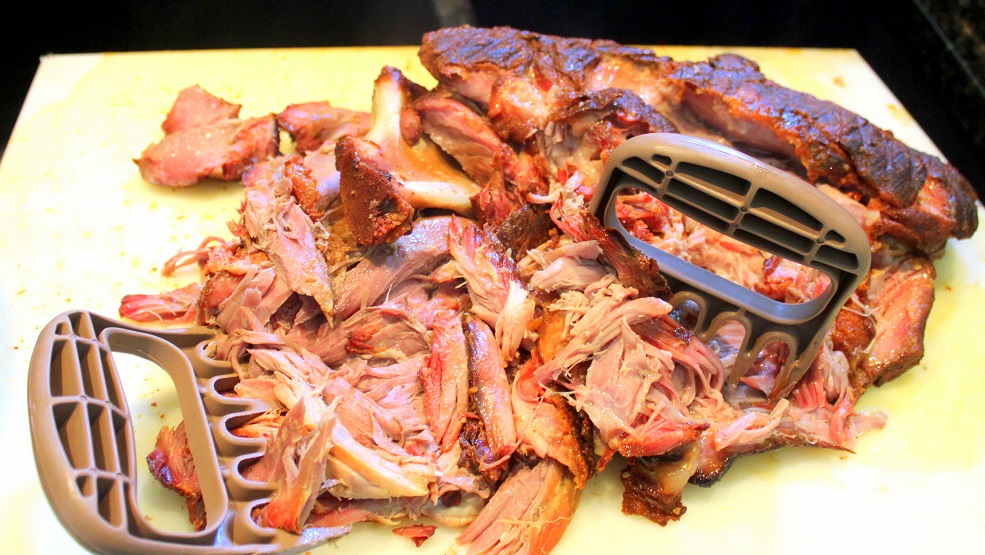
You hear the term, "Falling off the bone" a lot when talking about BBQ. Mostly with ribs. But when you talk about properly BBQed Pork Shoulder, falling apart is the more accurate definition. Once you reach that internal temperature of 195 degrees the meat literally pulls apart with just a tug. Literally, shredded, but you certainly can just grab a handful and pull.
By smoking you add an extra layer of flavor to the meat. Not only the BBQ Smoke flavor but also the oozing, melting Dry Rub that flavors the inside of the meat but also that rub ends up crusting up to form a bark almost crunchy chewy part that has caramelized into pork candy. A crunchy texture is added to the moist tender shreddable pork.
So, A Dry Rub, Long (overnight usually) cooking time, constant temperature monitoring, tricks to add moisture throughout the cooking time, plus many folks have the mistaken impression that you need to spend several hundred dollars on a dedicated smoker to make this at home.
But if it were easy, anyone could do it... HEY... IT IS EASY AND ANYONE CAN DO IT AT HOME!
Even with "
Just" a simple Weber Kettle style grill. The Weber kettle is the most popular of charcoal grills. Selling for under $100, it is everywhere. And honestly, before you spend hundreds and hundreds (and sometimes thousands) of dollars on a dedicated smoker, you really should know how and why smoked meat works. How a tough miserable cut of meat like a pork shoulder is transformed into moist succulent pulled pork. Best way to understand is to break out the simple Weber and know the steps. If you can smoke on a Weber (you can), you can then justify spending the money on a dedicated smoker.
OK... Let's get started...
First up is to make a spice rub. You certainly can buy a store bought rub. There are plenty of them on the market and most are delicious and work fine. But by making your own you are able to personalize the finished product (bragging rights). You can also control the salt. If you read the labels of the store bought rubs, most often salt is the main ingredient. It works not only as a seasoning but also as a preservative, extending the shelf life of the mix. Who knows how long it sat on the shelf?
And besides... Making your own is FAR cheaper than buying pre-mixed.
OK... Here's my basic Rub Formula...
Makes enough to season two 12 Pound Pork Shoulders, 3 Cups. But go ahead and make a double batch. It store well in a glass airtight jar, kept in a dark place for up to 3 months without losing any of it's flavors.

1 Cup Brown Sugar
1/2 Cup Salt
1/2 Cup Smoked Paprika
1/4 Cup Garlic Powder
1/4 Cup Chili Powder
1/4 Cup Ground Pepper
1 tsp Cayenne Pepper
1 TBS Cumin
1 TBS Onion Powder
Just combine all ingredients, mix well. I always mix with my fingers so I can break up any clumps.
Next is to prep the meat.
Take a look at the fat. there is a large fat layer on the bottom (top???) of the shoulder. Some of it will melt and render out as the pork cooks (remember, fat is flavor). But not all of it. Basic rule is to trim off the harder fat pieces. These hard pieces will not render and simply stay as fat or worse harden into gristle. So trim away on the fat layers on the outside of the shoulder.
And now,GENEROUSLY rub the shoulder with the spice rub. Notice it is called a rub, not a sprinkle. Use your hands and rub the spices into the meat. Top, bottom, sides and ends; be sure to rub every inch.
I made two pork shoulders. It's always a party when you smoke something.
I wanted to show this photo. By the time I was finished with the second shoulder, the first one had already started to mix, mingle and meld with the rub. The rub liquefies to look more like a light coating of a BBQ Sauce than a dry rub. This is a very good thing as the rub becomes one with the meat... Grasshopper
OK... Time to rest the meat in the spices for 30 minutes. This also alows the meat to begin to come to room temperature prior to cooking. During the thirty minute "rest", it is now time to prepare your grill...
There are a couple of must have accessories that you will need to guarantee success...
The type of coal is very important. DO NOT EVER EVER EVER USE MATCHLIGHT TYPE COAL. Instead look for a brand that advertises itself as 100% natural or all wood. Anything else will have chemicals used to hold the briquettes together. These chemicals will add an unpleasant taste to your meat. Use 100% natural.
You will want a "Chimney" to light the coals... You'll see what I mean in a minute...
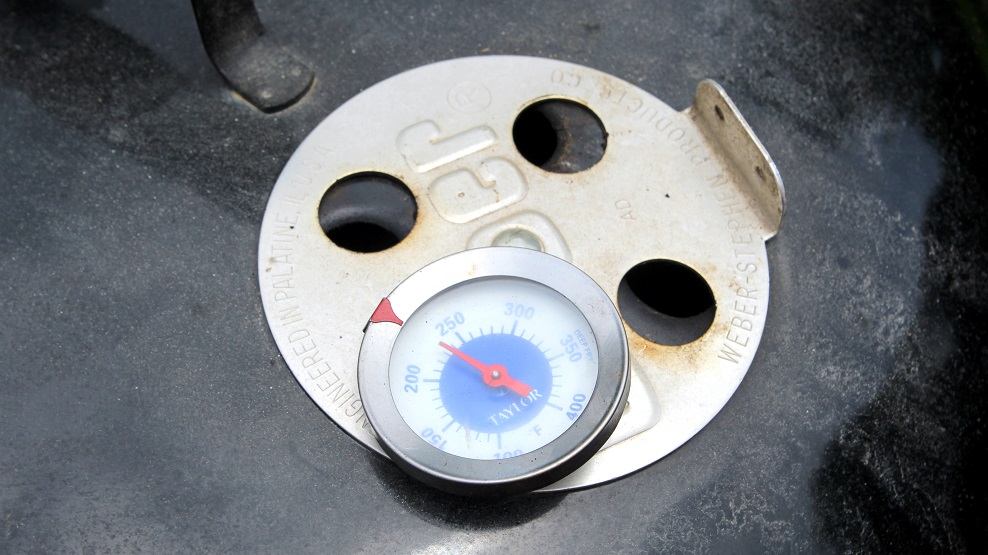
Next you need a thermometer to measure the internal temperature of the grill. This is not a meat thermometer, instead it is one to be used to measure the air temperature. One of those dial types works fine, as long as you have a long enough tip to reach the actual temperature of the cooking level. The top of the kettle will be much hotter than the cooking level just a few inches lower. Stick this through a vent, making sure the tip does not touch any meat or metal and it works fine.
You will also need a way to measure the internal temperature of the meat. Again, a dial type probe can work, although it is inconvenient to measure temperature that way as you need to remove the meat from the heat (open the lid is the same as removing from heat... but we will get to that in a second). Better to invest in a temperature probe that comes with a heat proof cord that you can leave in the meat and measure from the outside. Cheap ones of these are available for around $20 and worth every penny!
And that's all the "must haves". It does help to have a remote probe meat thermometer as well. Certainly if you make smoking a way of life you will want to invest in a good thermometer.
OK... Time to prep the grill for INDIRECT HEAT... Here's the most important part in order to get your ribs restaurant quality. It is important that the heat and smoke travel around the kettle, like a convection oven. It is equally important that you do not "grill" the ribs, meaning the heat (coals) is not directly below the ribs. That is too hot, too direct of heat. Direct heat will burn, indirect will allow low and slow smoking, making fall off the bone tender juicy and delicious!
So... Here's the steps for indirect heat on a Weber Kettle Grill...
OK, remember All natural Wood Briquettes...
The bag also reads 100% Hardwood Charcoal.
OK... there is a math factor here...
20 Briquettes. That's all you need now, count out 20 briquettes and put them in a chimney...
And light the chimney... You use a few pages of newspaper wadded up and stuffed into the bottom, there is a wire rack keeping the newspaper separate from the coal. Light the paper and let the coals sit on top of the fire for about 10 minutes...
After 10 minutes the coals should show signs of being lit... Ash around the edges and deep inside glowing red. Also little wisps of smoke....
If not, relight another few pages of newspaper and repeat the 10 minute wait.
If so, wait for another 5 minutes and then pour...
BUT...
Only pour around one edge... Indirect remember. You do not want the coals spread to reach under the meat.
Pop on the grate and you are now ready to cook...
Notice that I have the handles of the grate, one side directly over the stack of lit coals. This is IMPORTANT so that you can add briquettes without removing the grate.
And the photo above shows the MOST IMPORTANT TIP for insuring Restaurant Quality Low and Slow smoked ribs...
TEMPERATURE. 225 is your goal. Never higher than 250, never lower than 220. The air vents at the op and at the bottom of the kettle are adjustable, open wide and more oxygen flows into the kettle and the fire burns hotter. Close them and no oxygen gets in and the fire dies. You need that happy medium. Check your temperature early and often. It will take you another 10 minutes or more to get the vents right. Do this before you add the meat.
Proper temperature control is VITAL. So Vital I showed the photo twice!
OK... Time to load up the grill. These pieces of meat are HUGE, but they do fit. Indirect heat remember means to place the meat over the area that does not have coals underneath. They fit.
Just before closing the lid, add a few wood chips on top of the coals. You want hints of smoke, not billows. Just a few chips anytime you open the grill works just fine, Especially with the hard wood coal.
Next tip is to place a pot of beans over the direct heat. This does a couple of things. First, the beans will simmer over the direct heat. With this small amount of coals you will not get a hard boil. But what you do get is a slow simmer that adds gentle steam into the kettle, keeping your meat moist. Remember in the rub we used brown sugar. the extra steam helps to keep that sugar from caramelizing too fast and making that bark burnt instead of candy. The beans also help to spread that heat around the inside of the kettle adding to the convection effect. I have an excellent
Beer Beans recipe that works perfect with this method. Just enough liquid to simmer away and still leave a thick rich sauce.
And another tip for moisture...
Fill a spray bottle (be sure it is VERY VERY clean, in fact best to buy a new one just for cooking. You do not want a hint of Windex taste). You can use simple Apple Juice to spray the meat any time you open the grill. Me, I use a bottle of BEER. Adds an extra level of flavor (and sounds cool when you talk about this with the guys (and you will)).

Check the temperature after about 15 minutes and you should be back up to 225. If after 15 minutes it is not 225, add a few more coals through that opening in the grate you positioned over the HOT COALS.
And that's it for the next 8 hours...
Well, kind of...
Remember what I said about temperature... Low and Slow; 225 to 250 degrees. NEVER any higher and as much as possible never lower. So, we have to deal with the limitations of a Weber kettle grill.

If you had a dedicated smoker you would be able to leave everything alone for most of that 8 hours. A smoker is made with thicker heavier steel that holds the heat and stays hot longer. the thinner metal of a Weber will lose heat. This means you have to have the vents open more to allow more oxygen into the kettle to allow the coals to burn hotter. This also means they lose their heat faster. Instead of several hours in a smoker, you will start to lose heat in just an hour.
Which is fine... You can replenish the coals. Just 10 briquettes this time instead of 20. No need to light them first, just drop them on the still lit and slightly glowing old coals. they will light on their own shortly.
But that also means you have opened the kettle. You want to do a couple of extra things besides add coals.

The meat needs to be turned. Sure you have set up for indirect heat and the meat is not over the coals. BUT the area closer to the coals is still a bit hotter than around the edges of the grate. So you want to carefully (I use two big spatulas) lift the meat and turn.
You also want to add just a few wood chips.
You also want to use your spray bottle and give your meat a little spritz. MOISTURE GOOD!
You want to do all of this as fast as you can. You lose a LOT of heat when you open a kettle grill. It is like starting all over again. Once you get the hang of this you can do everything in less than a minute... really... BE FAST!
OK... Now just repeat every hour for 8 hours. Again, remember if it was easy everyone would do it. But also, it is only 1 minute every hour 8 times... Under 10 minutes.
And in 8 hours you are done...
Well, sort of... Your goal is an internal temperature of 195 degrees. This is the temp where the meat practically falls apart on it's own.
We are not there yet.
If you look close you will see the temp is 140 degrees. At this point you are down "Smoking". The smoke flavoring has already penetrated as deep as it is going to get. Once the meat hits this temp it stops absorbing good smoke. If you continued to billow smoke (or even as we are trying, wisps of smoke), all you will do is add a butter almost burnt taste.
This is very very good news!!! Our hourly obligations are now done. We can move inside, cook in an oven and get a good nights sleep.
Here's what you do...
Preheat the oven to 225 degrees
Lay out a LONG sheet of heavy duty aluminum foil. Enough to double wrap each Pork Shoulder individually.
I add a glaze to the meat at this time. Once we seal the meat in the aluminum foil you will not get a chance to spritz with the spray bottle.
My glaze is a simple mixture of 4 TBS Honey whisked together with 4 TBS Beer (use a real beer, not light for more flavor). Drizzle this over the top of the meat. It will eventually melt down and coat the entire shoulder.
Double wrap the shoulders tightly with the foil. Set on a jelly roll cookie sheet in case the foils rips and starts leaking. Attach that instant read remote probe meat thermometer so you know the internal temperature of the shoulder without opening the oven. Move the pans into the oven close the lid and sleep the sleep of the angels!
Be patient. It took over 2 hours for the temperature to move from 190 to 195, but eventually you will get there.
And you are done. Open the foil, allow the meat to "rest" for 30 minutes (very important, let it be).
And viola... Serve this while your neighbor opens a package of hot dogs and laugh laugh laugh!!! And then invite him over for a sandwich and you can brag all about your 18 hour cook session, your home made rub, spring and glazing with beer.
Worth all that time and effort!
*************************************************************************
So, I am also adding to my Growing list of "
52 Cooking With BEER Recipes"!!!
Everyone knows about cooking with wine, but BEER has so much more complex flavors. I imagine the day after beer was invented, someone made an Irish Stew. Cooking with beer infuses recipes with this intoxicating concoction of hops and barley in an effort to enhance and enrich everyday food.. Come take a look, sure to have something you might like to try. All recipes have been tested and WORK!
*************************************************************************
Also, I am pleased to list this as one of my Growing list of "
52 Grilling Time Secret Extras" or "
52 Ways to Cook BBQ and Grilling Recipes"!!!
Well over 52 recipes actually as I just can't stop... Over 100 in one grilling season (I love to grill!). But not just leat... Drinks, Condiments (LOTS of different BBQ sauces), Drinks, Desserts... even specialty items like GRILLED Pizza, and fun shaped Watermelons. Easy and these ideas will make you the MASTER of your Backyard Domain!
****************************
PINTEREST**************************
Come and find me on
Pinterest... Any of my "52 Ways to cook" Boards are worth following. If you like this post, please take a second and "Pin" this to your own boards... Better yet, if you are part of a foodie group board please take a second and add this post to your group pins... best way to show your Love!
 And BTW, if you are not yet part of a group board, drop me an email at Contact@eRecipeCards.com and request to be added to my group board... FAVORITE FOOD BLOGGERS! (be sure to include your pinterest ID when you write) Once you are added, any pins you add will be seen by 10s of THOUSANDS of followers of the board (and growing daily).
Rules, only 2...
- In order to join you need to start following the group board as well as at least one of my boards.
- And you must ONLY pin original sources, posts from food related bloggers only. If you are a blogger, this is a great way to have thousands of potential readers see your work, If you are a fan of bloggers, a great way to share your favorites...
Come and be a part of ... FAVORITE FOOD BLOGGERS! on Pinterest