Friday, April 29, 2011

Pizza - Diet Pizza... REALLY the 17 Day DIET PIZZA


Hey everybody...


I AM STARVING...


Well, not really.  But seriously, my long suffering wife made a request last week.  Wedding season is shortly upon us.  We have been invited to the wedding of the century (well, in our family anyway).  She decided she was going to live by the 17 Day Diet for the next 34 days (I know, like Barbie says, "Math is hard.").


Personally, despite the size of my ass, I am just not a fan of diets.  Been on them before, lost on them and gained when the "diet" ended.  In the last couple of years, I have adjusted my lifestyle and become comfortable with my health (much improved), and my ass (just a little improved).  I am more a believer in real ingredients, no additives, no multi syllable alternatives to natural foods.  I cook with sugar, cream, butter.  I love my breads and desserts.


But, since my job is to be my wife's personal chef, for the next few weeks, carbohydrates are a serious no, sugar and fats are as well.  The diet was featured on an episode of "The Doctors".  It is not a deprivation diet, in that there are dozens and dozens of foods that you can eat as much as you like.  Chicken and fish for your proteins and most (but not all) vegetables as well as many low sugar fruits.  Spices (including salt) are allowed and condiments in moderation.  You are limited to 2 TBS of Olive oil a day and 2 eggs (or 4 egg whites) a day.


It has the makings of the type of diet I really hate... Carrot sticks all day long followed by a flavorless piece of chicken on a bed of dry lettuce.  


OR


You can be a cook and study what is allowed and combine the ingredients into something tasty, filling and to do my best to not think of this as a "diet".


Tops on my concern (after accepting the challenge from my wife) was how to continue th PIZZA 2011 PROJECT... a different pizza each week for 52 weeks.  Since flour is one of the forbidden fruits, a typical pizza was out of the question.  So, I have to break down what I consider a pizza is (crust, toppings and sauce) and ponder what I can do...


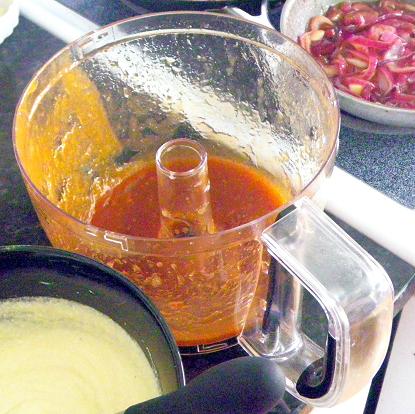
The sauce was the easy part.  Nothing but natural foods in my tomato sauce.  Remember, you get as much of the allowed ingredients as you like.  Here's what I did for my spruced up sauce...


8 diced ROMA tomatoes
1/2 cup Shitake mushrooms
4 cloves minced garlic
2 TBS "Not your Grandmother's HERBES De PROVENCE"


Without adding any additional liquid (wine or paste), you want to break the tomatoes down without drying out the pulp.  So, plan for at least half an hour to an hour to make the sauce.  Set the tomatoes in a sauce pan over low medium heat.  COVER the pot (prevents the steam from escaping, rehydrating the tomatoes as they break down).  After 30 minutes, you will see the mushy pulp, what appears to be over a cup of water (no additional water was added, just the release from the tomatoes).


Add the remaining ingredients, cook for another 10 minutes.  Run everything through a blender and you have a very basic (very healthy) and 17 day diet worthy Marinara Sauce.


So, the sauce was easy... now to move on to the toppings...


I considered just some chicken and BBQ sauce (remember, small moderate amounts of condiments are allowed).  But I had already used that topping once, and wanted to try something new.


So here's my Chicken/Ginger/Garlic recipe.  It makes a paste, has an egg white to hold everything together...


2 Chicken Breasts, roasted then minced 
Freshly minced Ginger, about 2 TBS
Freshly minced Garlic, 1 TBS
4 Green onions, sliced thin, including most of the green parts
1 TBS Red Wine Vinegar (it's allowed)
1 Egg White


Cook the chicken and mix everything else... Like I said, kind of a paste.


And next, the real challenge.  how do you make a crust without using any wheat flour????


OK, obviously, something is up...  It has the shape of a crust, but really, not quite the look.  But it did end up with the texture of a bread crust.


It's Cauliflower...


I have seen variations of this recipe for awhile.  Doing the Pizza Project, I have looked into alternatives to the traditional.  With just a few variations, the "dough" came together...


1 head of cauliflower... the entire thing, trim the stalks down to just the heads and about 1/2 inch sticking out.  then I steamed them for about 20 minutes until they were very soft.  Then, mince away.   They slice and dice easily to resemble rice.  


But, there is more to my crust...


1 whole onion, diced and sauteed in 1 TBS of Olive Oil until clear (Vadalia Onions hit the store this week, make great cooking onions)
4 TBS Oregano
4 Egg Whites


The Cauliflower is very very tender.  It mashes like potatoes.  Add everything together (I put it all through my Kitchenaid stand mixer with the paddle blade on and mixed until the consistency of mashed potatoes... or dough!


Now, there is a trick... It takes a while for the "dough" to firm up.  Much longer than it takes to bake a pizza.  So, you need to bake the pizza crust first before adding the toppings and sauce.


Preheated oven set at 500 degrees, with your pizza stone pre heated for 30 minutes.  This will insure the crust is firm top AND bottom.  Bake for 15-20 minutes until you can see the crust just start to brown...


Like this...


And really and truely, it bakes up and firms up just like a thick crust pizza.  It has a soft center, but the bottom and top is firm like a crust on a bread.


Now that we have the crust, add the chicken paste...


And top with the sauce.  I like adding a few slices of tomatoes to make it look even more like a pizza...


Return this to the preheated 500 degree oven.  Bake another 15 minutes and ...


Viola...


It has the look of a pizza.  It has a crust, toppings and sauce.  It has nothing but egg whites, fresh vegetables and seasonings.  By definition, it fits as a pizza.  But also, it features only ingredients that are meant to be a part of the 17 Day Diet!

Friday, April 22, 2011

Pizza - Jerk Spiced Chicken, Red Onions With a stuffed Crust


Greetings greetings greetings... What a fun pizza this was!  Especially since I told Jackie what I had planned, and she fully expected NOT to like it.  Something about the word "Jerk" spiced conjures an image of voodoo bloody tongues begging for something to cool your throat before you head to the refrigerator for the leftover casserole.


But, as in all things, moderation will make your life easier.  As well as balance.  A little heat and a little sweet goes a long way in allowing more heat in your food.  Even if you have a wife that is not self aware enough to realize how much she likes spicy food.


But I digress... Jerk spice is primarily Jamaican in origin.  When possible, it contains (among many) two ingredients that give it a distinctive taste.  Allspice is always included in any Jerk Spice combination.  But the real distinctive taste comes from Scotch Bonnet Peppers.  Sadly, they are very difficult to come by if you make your own rub.  Back in my island living days, there was a jar available at most stores.  I did bring a jar back with me.  Even a year later, it still packs a powerful punch.  However, there are many many commercial jerk spice mixes available.  Just be sure to look over the ingredient list and make sure Allspice and Scotch Bonnet Peppers are among the ingredient list.  Do not hesitate to use the spice.  But, be aware... No need to coat and dredge.  A sprinkle will do it.  In fact, grab a chicken breast, slice it into 4 or 5 pieces and sautee it with different strengths.  Even just the minimum will still add a distinctive taste.


OK... Next addition to the classic pizza I am doing is the stuffed pizza crust.  So easy, and yet there are adds for a nationwide pizza delivery company that makes stuffed crust sound like the greatest thing since sliced bread.  In my humble opinion, it is over rated.  But I enjoy that bit of crunchy bread with just a hint of the sauce and leftover toppings at the end of a pizza eating session.


But, many folks are ordering from that national chain just because you get that little extra gimmick.  


Like I said, so easy... Just roll out your pizza disc of dough extra big.  Leave 1 inch around the edges without any sauce, cheese or toppings and fold that inch of dough over the toppings at the end.  You can do a fancy roll, or just lump it over.  If you really want the full treatment, when you spread the sauce and toppings, add a bit extra at that mark that will be covered.

And that's it.  No more tricks to it.


OK, for this pizza, I repeated the beer bread pizza crust I talked about last week Click HERE).


For the sauce, I used my Spruced up, shitake mushroom sweetened sauce, again, for that recipe,  Click HERE).


I Caramelized the onion slices in a TBS of butter and some brown sugar (see, the sweet to contrast with the heat).


And I just sauteed the chicken in a little oil after sprinkling some of the Jerk Spice.


  • Preheat oven and pizza stone (or heavy baking sheet) to 550 degrees for at least 30 minutes.
  • Roll your crust out on parchment paper to your likeness... Thin, Chewy or thick like a bread.
  • Brush Olive oil around the edges to get a beautiful Golden Brown and Delicious looking crust.
  • Salt and pepper the crust at this time
  • Layer the sauce to within 1 and 1/2 inch of the edge
  • Top with the cheese
  •  and the Chicken and onions..
  • Bake for 10-12 minutes.
  • serve!


...

Thursday, April 14, 2011

Pizza - Beer and Brats with details on a Beer Bread Pizza Dough Formula


Look close...


Can anyone see the subtle subliminal product placement in the pizza?


Does it help if i tell you that the crust is a modified beer bread pizza dough recipe?


10 extra points if you can name the product... Anyone???


Maybe this picture helps, a little clearer view of the subtle subliminal product placement...


OK, maybe this will help... A couple of weeks ago, the very good folks at FOODBUZZ sent me an offer I could not refuse.  One of my favorite beer producers offered a few select bloggers the opportunity to create a recipe using their product.  Since I have cooked more than once with beer, as well as already being a fan of this particular brand, it was a no brainer.  So, thanks to Foodbuzz and...


The good people at New Belgium Beers, makers of a personal favorite drinking beer of mine, Fat Tire Amber Ale, I decided to make me a beer themed pizza!


Now do you see the subtle product placement???


See the strips of mozzarella with the hub in the center???


Maybe it helps if you squint a bit, down a couple of bottles of Fat Tire, and you can picture that FAT bicycle TIRE embedded in the pizza!  I figured it was the least I could do considering that (here comes that legal disclosure part) The good folks at New Belgium Beer (along with the equally good folks at Foodbuzz for setting the "deal" up) reimbursed me for the beer I used and served the day I made my specialty pizza.  That's right, under the heading of, "It's Good to be ME!", FREE BEER!


This would be a wonderful opportunity to test something I have been reading lately.  That is that a beer in the dough will add great body, flavor and a wonderful crunch to pizza dough.  And sure enough, it did.  I adapted a recipe I read on the King Arthur Flour Website.  It came out WONDERFUL!  Actually, this is the best tasting crust I have made for the Pizza 2011 Project.  That's right again... It took a fourth of the way through the year, but I honestly have a new favorite "go-to" pizza dough recipe.  It comes together fast, the rise time is comparatively short (only 1 hour when in a warm place) and the distinctive flavor adds a nice kick.  As always, when you cook with alcohol, the actual alcohol cooks out.  So even your Friends of Bill or my Baptist mother can enjoy the taste without the guilt.  If you want to argue, did you know that cooking Vanilla actually has a higher alcohol content than scotch.  So, if you ever add vanilla to your frosting that does not get cooked, you could be serving your Baptist mother a shot of booze in every cupcake (well, I exaggerate, but you get the idea... more actual alcohol in a vanilla frosted cupcake than in this pizza dough with a full bottle of beer added (and the alcohol cooked out))


OK... let's see what I did...


Here's the details on the Beer Pizza CRUST


2 1/2 cups all purpose Flour
1 1/2 cups Semolina Flour (can substitute 3/4 cup yellow Corn Meal and 3/4 cup "regular" flour)
1 TBS Smoked Paprika
2 tsp Instant Yeast
1 tsp Baking Powder
2 TBS Olive Oil
1 1/2 cups BEER!
NOTE: the beer needs to be warmed to @100 degrees.  This starts the yeast doing what it does during the rising (proofing) stage.


And, could not be easier...

  1. Mix the dry ingredients.  I use a stand mixer, but of course, mixing by hand has it's zen like charms.
  2. Add the Olive Oil and the entire 12 ounce bottle of beer
  3. Mix and need well for at least 5 minutes.  Longer if mixing by hand.  the dough will be slightly tacky, but not so wet that it does not hold it's shape.
  4. The dough needs to rise (proof) for at least an hour, possibly 2.  It depends on where it is set.  I like to pre warm my oven on it's lowest setting.  Then I open the door and allow the initial heat to leave.  When I put the bowl with the dough in the oven (turned off now), it is the perfect environment for any dough to proof.  Slightly warm, no breeze.
  5. So, form the dough in a ball, put in a large bowl, coat the dough with just a slim layer of Olive Oil, cover with plastic wrap and pop in that now about 100 degree oven for 1 to 2 hours.  Until the dough has doubled in size.
  6. These amounts will make 2 thin crust pizzas, 3-4 cracker thin crust pizzas or in this case, one LARGE thick crust Sicilian style pizza.  The dough will freeze, or if you plan to make more pizzas within the week, it will keep in the refrigerator.  Be sure to allow the dough to warm to room temperature prior to making the next pizza.

And a note on the beer...


When I went beer shopping, I saw that New Belgium has introduced a new beer (to me).  Here's what their website says about their MOTHERSHIP WIT... "organically-produced beer, Mothership Wit Organic Wheat Beer elevates the zesty Wit or White beers of Belgium. Our far-flung Beer Rangers affectionately refer to our Fort Collins brewery as the Mothership, a name that conjures images of earth shot from space and the interconnectivity of it all. Mothership Wit is brewed with wheat and barley malt, as well as coriander and orange peel spicing resulting in a balance of citrus and sour flavors held in suspension by a bright burst of carbonation."  Did you read that carefully?  Not only the usual wheats and barley found in beer, but also Coriander (Cilantro) and citrus.  Sounds perfect to flavor almost anything when you cook with beer.  So, I saved my much loved Fat Tire bottles to drink while eating my pizza and used the Mothership Wit to make and flavor the dough.


OK... While the dough is rising, I work on the sauce, the sweetened caramelized onions and slice the brats...


About 2 hours before serving time, I start on the sauce...

2 can (14 ounces) diced tomatoes
1 small can tomato paste
1 cup shitake mushroom buttons, cut into thin slivers
1/2 cup red wine
4 cloves garlic
1 cup Pecorina Romano cheese (melts great on liquid)

Combine everything in a sauce pan and simmer for 30 minutes. Then take your handy hand mixer and blend to a thick paste.

Next up is to caramelize the onions...

I just rough sliced one sweet onion and separated the rings. I then cut all those rings in half. I melted 2 TBS of butter in a small saute pan, added the onions and 2 TBS Brown Sugar, mixed well with the butter and allowed them to simmer on medium heat for about 30 minutes (stirring occasionally).


And now... time to make the pizza...

 First up, the dough... Punch down the dough.  If making a thin crust, divide in half and save a portion (or make 2 pizzas)!  If you are making a cracker thin, divide in 3 or 4.  Today I am making a thicker Sicilian style.  I spread the dough by hand (on a piece of parchment paper).  I made sure there was a thick edge.  Added a couple tsp of Extra Virgin Olive Oil and brushed that around the dough, making sure the thick edge is well covered.  Salt and pepper the pizza now.  Allow this to proof for 30 minutes in this form before adding any toppings.  During this 30 minutes, preheat the oven and a large pizza stone to 500 degrees.


 And now, time for the BRATS!  Honestly, what's the logical topping for a beer dough pizza than brats... beer and brats, just rolls off the tongue.  I used a flavored brat, cheddar and jalapeño.  I sliced them very thin.  A Sicilian pizza has more sauce and more toppings than it's thin crust Neapolitan cousin.  I used 5 precooked, sausages, plenty to fill the pizza with this topping!


 OK... finally time to make it look like a pizza...


I want to brag on a cheese find.  Cappiello Scamorza cheese is an excellent pizza cheese. easy to slice thin, low moisture content (one of the reasons my crusts crisp up so nice), mozzarella combined with a hint of provolone for a stronger cheese taste. I add the cheese first, a thin layer between the crust and the brats. If you do not line your pizza with the slices of cheese, the grease from the brats will make your crust soggy.


 And now, time for the sauce.  Again, Sicilian style has more sauce than you might think is correct.  So, 2 cans of tomatoes, makes plenty of sauce.nice and thick, flavored with wine and sweet shitake mushrooms.  Just layer it over the cheese!  


TOP NOTCH!!! 


 Brats


Brats and 


More brats...


Lay em on thick!


 And onions... 


I chose to use caramelized onions (sweet) for this pizza to contrast with the jalapeño infused brats (heat).  It is rarely a good idea to have just a heat or just a sweet item in your pizza.  It's always better to try to balance the heat and sweet tastes.


See... toppings, toppings and more toppings over a thick bed of luxurious sauce and cheese!


Add a bit of decoration.  The Cappiello Scamorza Cheese is perfect, as it is not a runny melting cheese.  It melts, but it does mostly stay in one place.  You can use the cheese to write a message (Happy Bar Mitzvahs, Irving (make a BIG pizza if you want to write a lot).  Or, in this case, make a FAT TIRE! 


Slide in the oven for 10 minutes at 500 degrees.  After 10 minutes, drop the temperature down to 350. and cook for another 10 minutes.  The stone stays HOT (500 degrees), continuing to cook the thick crust, while the toppings stay hot but do not over cook.


Beer, Brats and Pizza - A natural fit!


Thanks New Belgium.  You can send me free beer anytime you like!


...

Wednesday, April 6, 2011

Pizza - Chicago Style Mango Hot Italian Sausage with 4 Cheeses - A Photo Essay


Take a look... A two inch tall (deep dish indeed) cast iron skillet (the BIG one) just filled with a thick chewy crust, 2 pounds of HOT Italian sausage (flavored with a sweet mango glaze), a pound of red onions (caramelized with that same mango glaze), a pound of mozzarella cheese, 1 pound and a half of ricotta, a generous portion of Parmesan cheese, all topped with a fantastic mushroom tomato sauce which includes a nutty Pecorina Romano cheese (two pounds of this sauce as well). 


Nearly TEN POUNDS of pizza!


I did have a little help eating this one.  Once again, new neighbors moved into the Cul de Sac, so plenty of help eating this specialty pizza that deserves a well earned place in my PIZZA 2011 PROJECT - 52 different pizza, one a week for a year!


There was a whole lot to this recipe (plenty of dirty pots and pans).  But I figure all those dirty pots and pans in the sink makes it clear how happy we are to have new neighbors.  Like I said, plenty to this recipe, but so well received, obviously a crowd pleaser!


Here's what I did...


First up is a specialty deep dish dough recipe.  I have a favorite thin crust that I make up every week. But for this monster, I needed a thick, airy style, flavored with cornmeal to hold up to all the ingredients.  Thin crust pizzas are a perfect balance of equal parts crust, sauce and toppings.  Ideally, a Chicago style is that same mixture of equal parts crust to sauce and toppings.


Here's how to do that...


4 cups flour
1 cup corn meal
3 TBS Sugar
3 TBS Salt
3 tsp Yeast (quick rise)
5 TBS Olive Oil
2 cups lukewarm water (100 to NO MORE THAN 110 degrees)


Warm up the Kitchenaid mixer with the bread hook attachment (or be ready to knead for at least 15 minutes).  Mix the dry ingredients, add 1 cup of water, then the oil, then follow with the rest of the water.  Add the last 1/2 cup slowly.  Dough is a funny thing, not always easy to measure water exactly.  add until you get that perfect mixture.


Continue to knead by machine for at least 10 minutes, or by hand until the it feels right (wish I could be more specific, but the dough is evenly hydrated, sticky, but not too wet... you just know).


Place the dough in a large bowl, coat the dough ball with a couple tsp of oil and cover the bowl with plastic wrap.  Place in a warm spot and allow to rise until it doubles in size (about 3 hours).  I do have a hint about that warm spot.  I preheat the oven on low for only about 2 minutes.  Turn the oven off, and it is the perfect spot to put that bowl with the dough to rise.


While that's working, time to start on the mango glaze for the onions and sausage...

1 cup Sugar
1 cup Red Wine Vinegar
1 ripe Mango, pealed, pitted and coarsely chopped
1 TBS Honey
Salt and Pepper to taste

Combine sugar and vinegar in a small sauce pan and cook over high heat until the sugar is melted. Add the mango and cook, stirring occasionally, until the mixture is reduced by half and the mango is soft, 5 to 6 minutes.

Transfer the mixture to a food processor and process until smooth. Strain through a fine mesh strainer into a bowl. Add the honey and season with the Salt and Pepper.


About 2 hours before serving time, I start on the sauce...

2 can (14 ounces) diced tomatoes
1 small can tomato paste
1 cup shitake mushroom buttons, cut into thin slivers
1/2 cup red wine
4 cloves garlic
1 cup Pecorina Romano cheese (melts great on liquid)

Combine everything in a sauce pan and simmer for 30 minutes.  Then take your handy hand mixer and blend to a thick paste.


Next up is to caramelize the onions...

I just rough sliced one red onion and separated the rings.  I then cut all those rings in half.  I melted 2 TBS of butter in a small saute pan, added the onions, mixed well with the butter and allowed them to simmer on medium heat for about 30 minutes (stirring occasionally).  I added 1/4 cup of the mango glaze and continued to simmer until the glaze was reduced and absorbed into the onions.  Remove from heat and set aside.

Alright, time to start forming the pizza...

This is the largest cast iron skillet I have - 14 inches (if you use a smaller one, you will need to cut the portions proportionally.  If you look at that first photo, everything fits perfect, just barely topping the lip of the skillet for a beautiful presentation).

Punch the dough down.  It will shrink to about half the raised dough size.  I oiled the bottom of the pan and plopped the dough ball into the center.  From there, start pushing the dough around until you get even thickness, on the bottom and up the sides.

Allow this to rest a second time for about 15 minutes.  This adds to the airiness of the crust.  If you like a denser, thinner, chewier crust, you can leave out the second proof (world famous Pizzeria Uno leaves this second proof step out, so it is OK... Me, I was after that even mix of same size crust to toppings and sauce look.

While the dough is proofing, time to work on the sausage.  I just browned 2 pounds of bulk Italian hot sausage, drained to fat and added the remaining mango glaze, mixing until all the sausage is coated.

Finally, time to work on the cheese sauce...

1 1/2 pounds of ricotta cheese
2 eggs
2 tsp Salt 

Whisk together until creamy.

And, have ready a pound of thinly sliced mozzarella cheese.

And finally, it's time to make the pizza!

Preheat the oven to 375 degrees.

Take a fork and punch a few dozen holes in the bottom of the crust to prevent bubbling.

Bake the crust for about 5 minutes to set the proof.  If you skip this step, the dough will fall while you add the POUNDS and POUNDS of filling.

Next, remove from the oven and brush 2 TBS of olive Oil over the crust (including the top to insure even browning).  Add a few turns of freshly ground pepper and some coarse sea salt...

Take your mozzarella slices and line the bottom and sides with the cheese.

Again, VERY IMPORTANT to get a layer of cheese between the grease of the sausage and the moisture of the sauce.  This keeps the dough soft and chewy like a focaccia bread.

Next is to add the toppings...

You can mix the onions and sausage together, me, i prefer to add the sausage and then add a layer of onions.

This nearly fills the entire pizza.  But that's ok, the liquid steps to follow ooze down into the cracks and crannys in the sausage, filling every inch with flavor...

Add that whipped ricotta/egg cheese mixture now.

You could add the tomato sauce first, and have the cheese on top if you like a browned cheese look to your pizza.  But the classic Chicago deep dish pizza always has the tomato sauce covering all the toppings.  So Cheese first for me...

And last but not least...

Top with the tomato sauce.  To insure a good mix, i took a fork and pushed down the sauces into the sausage.  Everything just evenly filled the entire cast iron skillet.

bake at 375 degrees for 45 minutes.  Actually, I wanted to insure the bread was fully cooked (remember, the tomato sauce, sausage and onions were already fully cooked, so all I was really "cooking" was the bread dough).  To insure the dough was fully cooked, I inserted a meat thermometer in the edge of the crust to make sure the internal temperature of the crust had reached 195 degrees.


We had 10 people for dinner this night.  I served a salad before the pizza.  I had enough left over for lunch for me the next day and a left over dinner for just Jackie and me.

Made plenty for a party!


I served it piping hot from the oven.  So while plating, the sausage oozed from the top.  But that was OK... what it lacked in perfect presentation, it more than made up for in taste.  It was a lot of work, but, like Mary poppins...

Practically Perfect in Every Way!


...